Updating employees’ pension plan details
Making changes to your employee records is a two-step process. Once you've made changes, you must remember to confirm your updates.
We'll process your employees' statements as soon as we've received your final payment for the review period.
What you'll need
- Details of any amendments you have to make in a CSV file. You don’t need to include details for employees whose information has not changed.
- Your administrator login details for online service (opens in a new window).
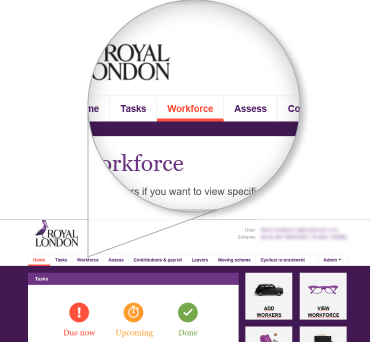
1. Find and select 'Workforce'
Once you have logged onto the dashboard, look for a navigation menu labelled 'Workforce', just underneath the Royal London logo.
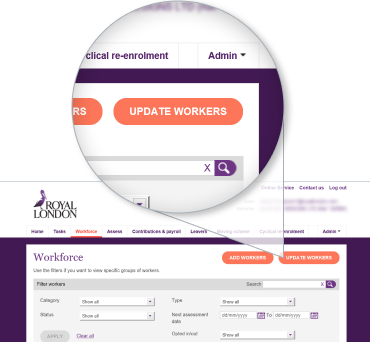
2. Click 'Update Workers'
You'll find the 'Update Workers' button on the top right hand corner of the page. The button is orange, you can't miss it.
3. Update your data using a CSV file
You only need to have the data for the employees you need to update, not your entire workforce. You'll need:
Mandatory fields
- Title
- First name
- Last name
- National Insurance number
Optional fields (needed only if there are changes to be made)
- Address line 1
- Address line 2
- Address line 3
- Postcode
- Workplace email address
- Personal email address
- Annual salary
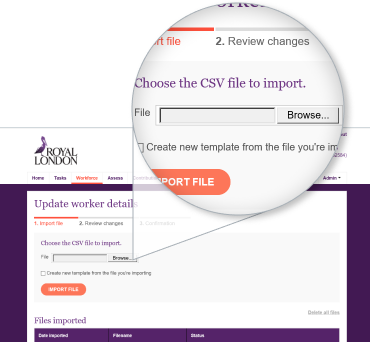
4. Upload your CSV file
- Click on 'Browse' to find your file.
- If you already have a template set up, you can choose the one you wish to update.
- Click 'import file'.
Not sure what a template is? Don't worry we've got additional guidance to help you create your own templates to help you manage your scheme.
What is a template?
A template allows you to keep your employees in groups, for example head office and another locations. This makes it easier to manage bigger schemes. When you make updates to your templates, only data that has changed will update. All other data remains the same.
Use our guide (PDF) (opens in new window) to help you create a template or our auto-enrolment dashboard video 'Making contributions' shows you how if you're not sure.
Name your template
You should name your template something that will be understandable later.
The option to name your template is only visible when you're creating a new template.
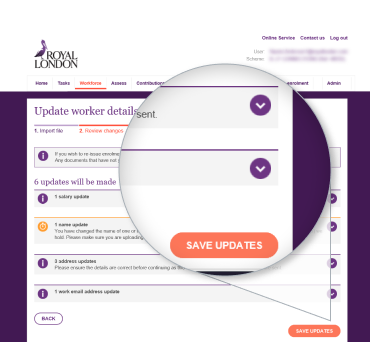
5. Review your updates
Where you already have a template set up, you'll now see this this screen. It shows what amendments have been made and lets you know what you need to do next.
Click on 'Save Updates' to confirm changes.
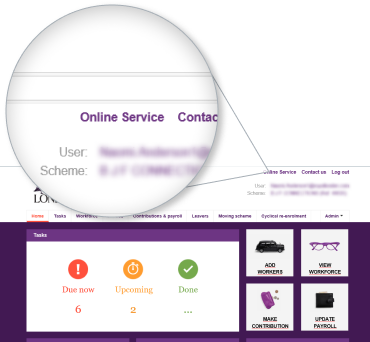
1. Select 'Online Service'
You can find 'Online Service' on the top right hand corner of the page, above the Royal London logo.
If you don't see this screen, skip to step 2.
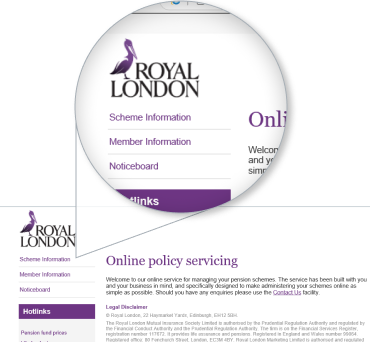
2. Select 'Scheme information'
'Scheme information' is the first link displayed on the left hand side menu, just underneath the Royal London logo.
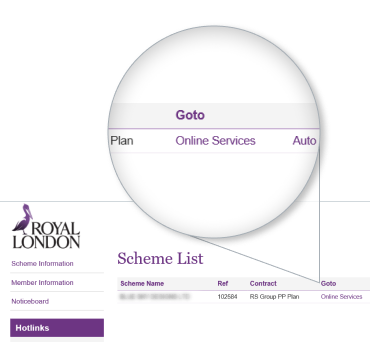
3. Select 'Online Services'
On this page, you'll find the link to 'Online Service' below the title 'Scheme List', to the right, next to 'Contract'.
4. Select 'Yearly Review changes'
To begin, select 'Yearly Review Changes' from the left hand side menu. This is the third link from the top of the 'Scheme Details' section.

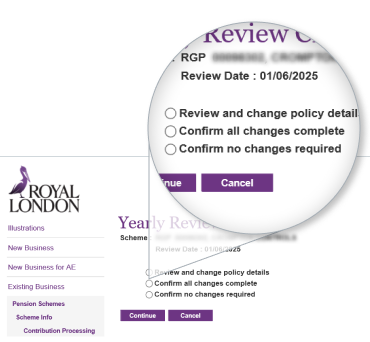
5. Confirm changes
You'll be presented with three options. Select 'Confirm all changes complete'. Click 'Continue'.
Questions?
If you have any questions, please contact your dedicated Corporate Servicing Team.